header_01.jpg
header_01_mobile.jpg

Shock Service: Everything for the Flow!

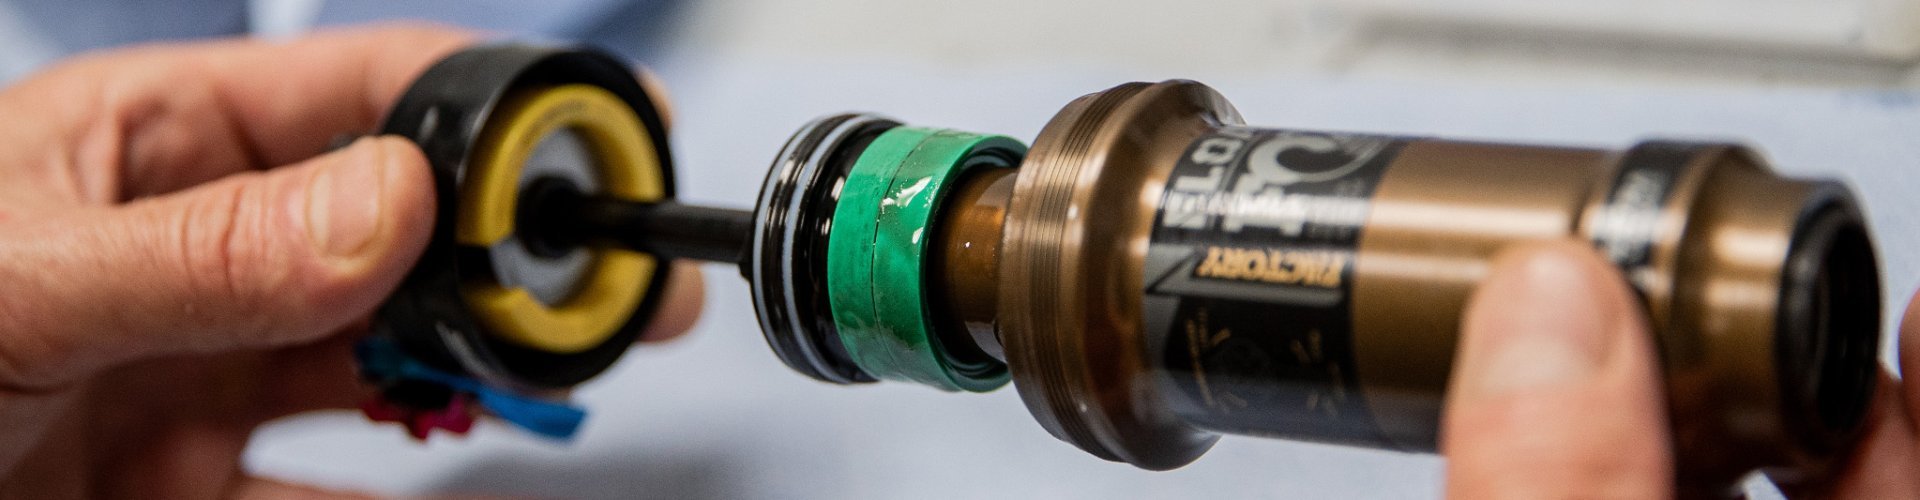
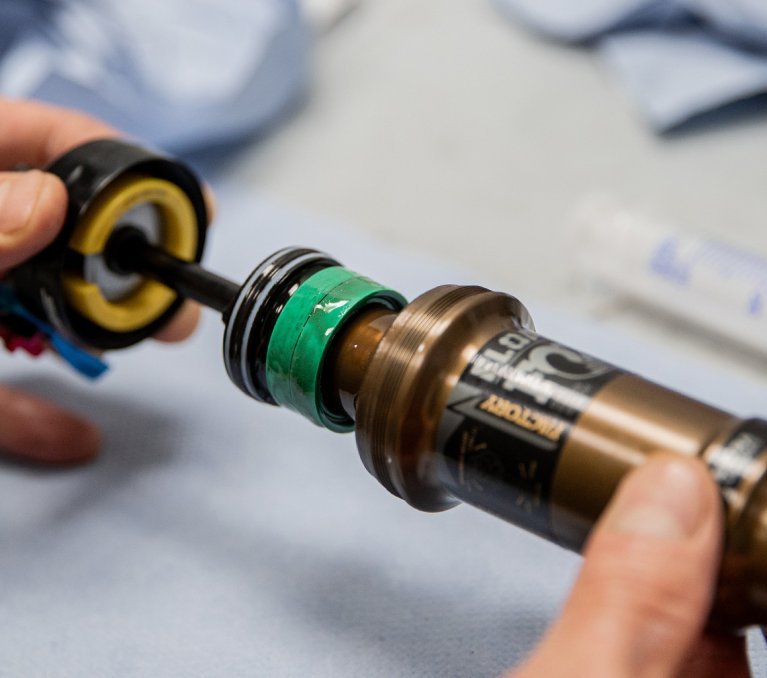
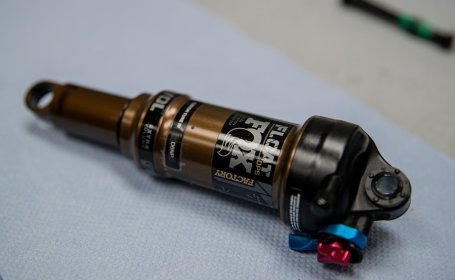
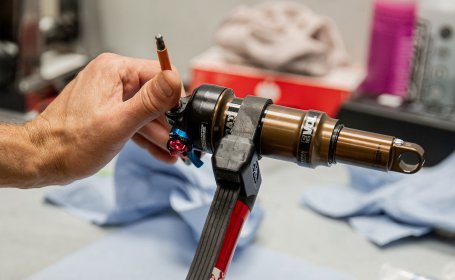
A shock can only show its qualities if it's properly lubricated. We'll show you the air chamber service using a Fox DPS shock as an example.

Shocks are a dime a dozen: From compact, simple XC-inline models to tech-loaded downhill flagships, with or without a reservoir, as coil spring or air spring variants. But no matter if you're in the entry-level or high-end territory: The core mission of every shock is to filter out impacts from the ground as much as possible, to not lose ground contact and to let you "glide" smoothly over the trail. Both aspects are there to maintain as much control over the bike as possible, allowing you to ride safely, consistently, and without fatigue at high speeds in rough terrain.

Although coil shocks have experienced a small renaissance, most of you, especially in the Cross Country to Enduro range, will be using air shocks. They are very versatile as the spring rate can be easily adjusted with a shock pump, and they almost match coil shocks in terms of performance.

The real fun comes with a smooth suspension.

The real fun comes with a smooth suspension.

Friction is the enemy!

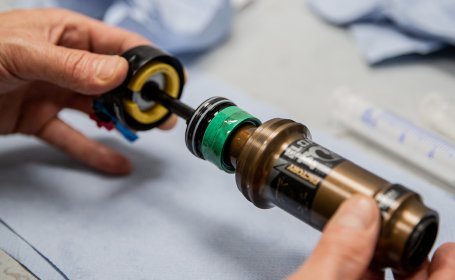
In theory, air shocks have a disadvantage over coil springs because the seals in the air chamber create friction, which slightly hinders performance, as friction always causes some inertia and makes the shock less responsive. The seals are lubricated, but the lubrication wears out over time. Without renewal, the main seal soon runs dry over the piston rod, and the dividing piston seal also runs dry in the air chamber. Especially in the transition between compression and rebound, the shock becomes stiff, making the suspension "choppy," and the involved components wear out even faster.

With regular service, lubrication at the "friction points" is always maintained. We recommend for casual riders, at least once a year, and for ambitious riders, at least twice a year to get a service. If you're racing at a higher level, it makes sense to service the shock just before the race weekend if you want to get the most out of the performance.

Small service, big service?

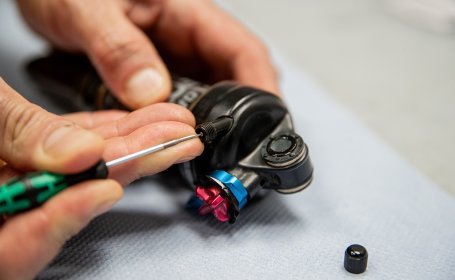
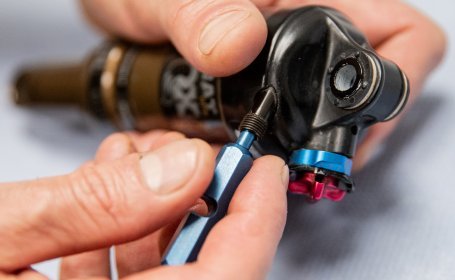
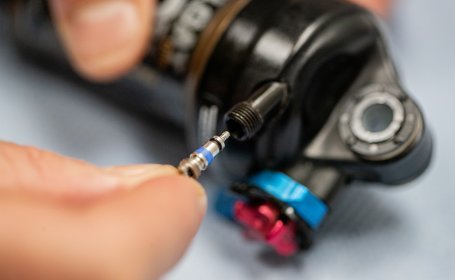
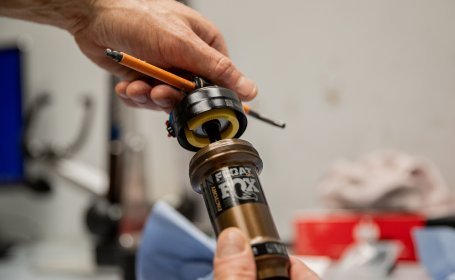
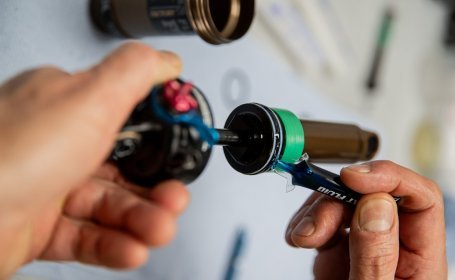
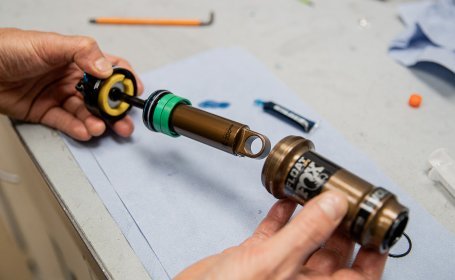
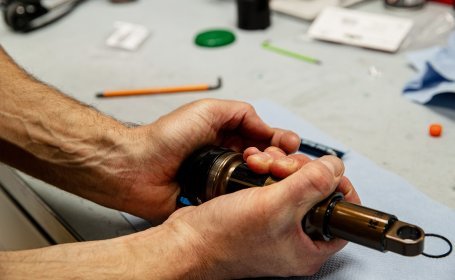
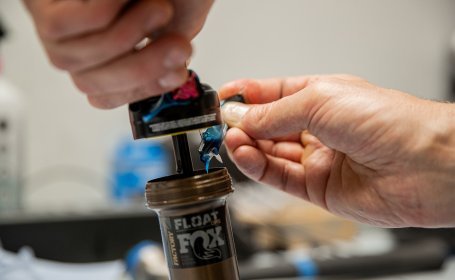
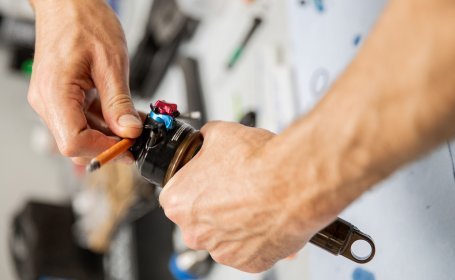
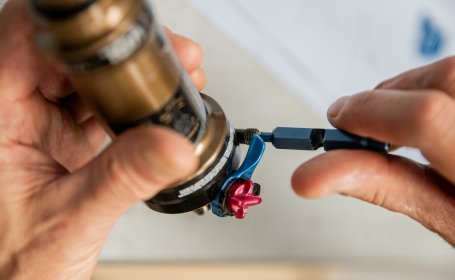
You've probably heard these terms before, but what's behind them? The small service is basically the air chamber service, where the piston rod and seals are cleaned and re-lubricated. It's very simple since you just need to remove the air chamber and don't have to dismantle the shock completely. However, if your shock makes squelching and slurping noises, it's time for a "big" service because air bubbles have formed in the oil, which significantly impair the damping function.

We're covering the small service here, since it's easy to do yourself and usually has the biggest effect on the performance of the suspension. We'll happily leave the big service in the hands of the professionals at the respective manufacturer.

Serious speed on rough terrain? No problem with sensitive suspension!

Serious speed on rough terrain? No problem with sensitive suspension!

Gather tools and supplies

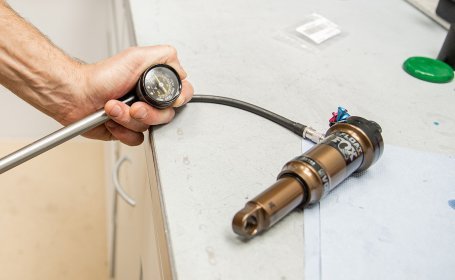
Here are the tools and supplies you need for your shock service

A brief detour on the shock pump

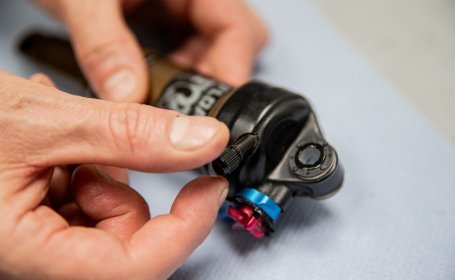
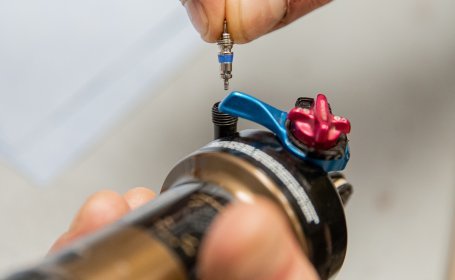
Since this question keeps coming up, we want to clear up a common misunderstanding. It's advisable to measure the pressure before releasing the air, in case you don't remember it offhand. However, when you screw the shock pump hose onto the valve, you increase the air volume of the shock by the volume of the hose to the gauge. Therefore, the pressure measured will be lower than the pressure in the shock before. From our experience, about 10 PSI "is lost" when screwing on the hose - depending on the size of the air chamber. Hence, it's often misinterpreted that the shock is leaky, although that's rarely the case. So, when you screw the hose onto the valve, you usually need about 4-5 pumps to get back to the previous pressure.

By the way: When you unscrew the hose from the valve after pumping, it hisses briefly. The air escaping is just what remained in the hose. Nothing escapes from the air chamber of the shock – so no worries. The pressure shown on the gauge is indeed in the shock.

Roll up your sleeves: Let's get started with the shock service!

1
Step 1: Remove the shock from the bike and clean it

Step 1: Remove the shock from the bike and clean it

The shock is usually removed with a hex key on both sides. If your bike is on a repair stand, lift the rear wheel a bit to relieve the tension on the shock. This makes it much easier to unscrew the shock bolts. Make sure the shock is thoroughly clean before we dismantle it. No dirt or dust should get inside! A rag with some penetrating oil is perfect for cleaning.

The shock is usually removed with a hex key on both sides. If your bike is on a repair stand, lift the rear wheel a bit to relieve the tension on the shock. This makes it much easier to unscrew the shock bolts. Make sure the shock is thoroughly clean before we dismantle it. No dirt or dust should get inside! A rag with some penetrating oil is perfect for cleaning.

2
Step 2: Release the air and unscrew the valve core

Step 2: Release the air and unscrew the valve core

First, you gotta unscrew the valve cap from the shock. By the way, it's not as "unimportant" as a tube valve cap since it has an inner rubber O-ring that seals, contributing to the shock's pressure stability.

First, you gotta unscrew the valve cap from the shock. By the way, it's not as "unimportant" as a tube valve cap since it has an inner rubber O-ring that seals, contributing to the shock's pressure stability.

We use a sharp object (like a flathead screwdriver) to press the valve and release the air. 

We use a sharp object (like a flathead screwdriver) to press the valve and release the air. 

Once the air is completely out, we turn the valve core counterclockwise with a valve core tool…


Once the air is completely out, we turn the valve core counterclockwise with a valve core tool…


… and carefully remove it.

… and carefully remove it.

3
Step 3: Open the shock and slide off the air chamber

Step 3: Open the shock and slide off the air chamber

The air chamber is threaded onto the shock body. Sometimes you can manage to unscrew it with just your hands, but usually, you'll need a strap wrench (like an oil filter wrench) and something to hold it in place; here we use an Allen key that we stick through the shock eye. Unscrew the air chamber counterclockwise.

The air chamber is threaded onto the shock body. Sometimes you can manage to unscrew it with just your hands, but usually, you'll need a strap wrench (like an oil filter wrench) and something to hold it in place; here we use an Allen key that we stick through the shock eye. Unscrew the air chamber counterclockwise.

Carefully slide off the air chamber. Inside, you may see a volume spacer in the positive chamber, like the yellow one here. This one is optional – if you don't have one installed: no worries. You're not missing anything.

Carefully slide off the air chamber. Inside, you may see a volume spacer in the positive chamber, like the yellow one here. This one is optional – if you don't have one installed: no worries. You're not missing anything.

Below the piston seal, you see here two green rings. These are the volume spacers for the negative chamber. If you don't have any spacers or a different number installed there, it's all good – just like the volume spacer in the positive chamber, these spacers are optional.

Below the piston seal, you see here two green rings. These are the volume spacers for the negative chamber. If you don't have any spacers or a different number installed there, it's all good – just like the volume spacer in the positive chamber, these spacers are optional.

4
Step 4: Clean the inside of the shock

Step 4: Clean the inside of the shock

Now it's time to wipe down the inside of the shock. There should be no old oil left inside.

Now it's time to wipe down the inside of the shock. There should be no old oil left inside.

We spray the air chamber with brake cleaner to remove all oil residues. After that, you can wipe inside again since brake cleaner also leaves residues.

We spray the air chamber with brake cleaner to remove all oil residues. After that, you can wipe inside again since brake cleaner also leaves residues.

5
Step 5: Lubricate seals and piston rod

Step 5: Lubricate seals and piston rod

After wiping the piston seal and the inner piston rod, lubricate the seal first. Best apply the grease or oil with your finger into the seal's groove. Only use the lubricants recommended by the manufacturer.

After wiping the piston seal and the inner piston rod, lubricate the seal first. Best apply the grease or oil with your finger into the seal's groove. Only use the lubricants recommended by the manufacturer.

The main seal at the end of the air chamber (pictured right) is lubricated from the inside. It's best to spread the oil or grease (depending on the manufacturer) with your finger.

The main seal at the end of the air chamber (pictured right) is lubricated from the inside. It's best to spread the oil or grease (depending on the manufacturer) with your finger.

6
Step 6: Lubricate air can and reassemble the shock

Step 6: Lubricate air can and reassemble the shock

Gently slide the air chamber back over the piston rod. Excess oil or grease from the main seal might be pushed out and remain on the piston rod. Don't screw the shock back together yet, ...

Gently slide the air chamber back over the piston rod. Excess oil or grease from the main seal might be pushed out and remain on the piston rod. Don't screw the shock back together yet, ...

... as you still need to add lubricating oil for the inner piston rod. You can find the needed oil and its amount in the manufacturer's instructions.

... as you still need to add lubricating oil for the inner piston rod. You can find the needed oil and its amount in the manufacturer's instructions.

Next, push the air chamber back up to the thread and screw it onto its counterpart. There’s no torque spec here since you can’t use a torque wrench – just tighten the air chamber "firmly" with your hand strength. You can also use the strap wrench again, but usually, hand strength is enough if the shock is grease-free and grippy on the outside.

Next, push the air chamber back up to the thread and screw it onto its counterpart. There’s no torque spec here since you can’t use a torque wrench – just tighten the air chamber "firmly" with your hand strength. You can also use the strap wrench again, but usually, hand strength is enough if the shock is grease-free and grippy on the outside.

Put the valve core back into the valve housing…

Put the valve core back into the valve housing…

… and gently tighten it with the valve core tool.

… and gently tighten it with the valve core tool.

Now you can pump the shock back up to the required pressure.

Now you can pump the shock back up to the required pressure.

7
Step 7: Reinstall the shock

Step 7: Reinstall the shock

Last but not least, the shock is reinstalled into the bike. You can find the required torque values in the frame manufacturer's instructions. Be careful: It might happen that no pressure balance occurs between the positive and negative chamber while pumping. If that’s the case, you’ll notice because the shock feels "rock-hard" and compresses only a few millimeters (if at all). In this case, you need to release the pressure and pump up the shock again. It's important to compress it a little while pumping (about every 20 pumps) so the piston seal can move over the inner pressure-balance groove, thus balancing the pressure between the positive and negative chambers.

footer_01.jpg