


How To: Inspect Your Bike
Ready for the season? We’ll show you how to prepare your bike for the upcoming season and which parts require special attention.
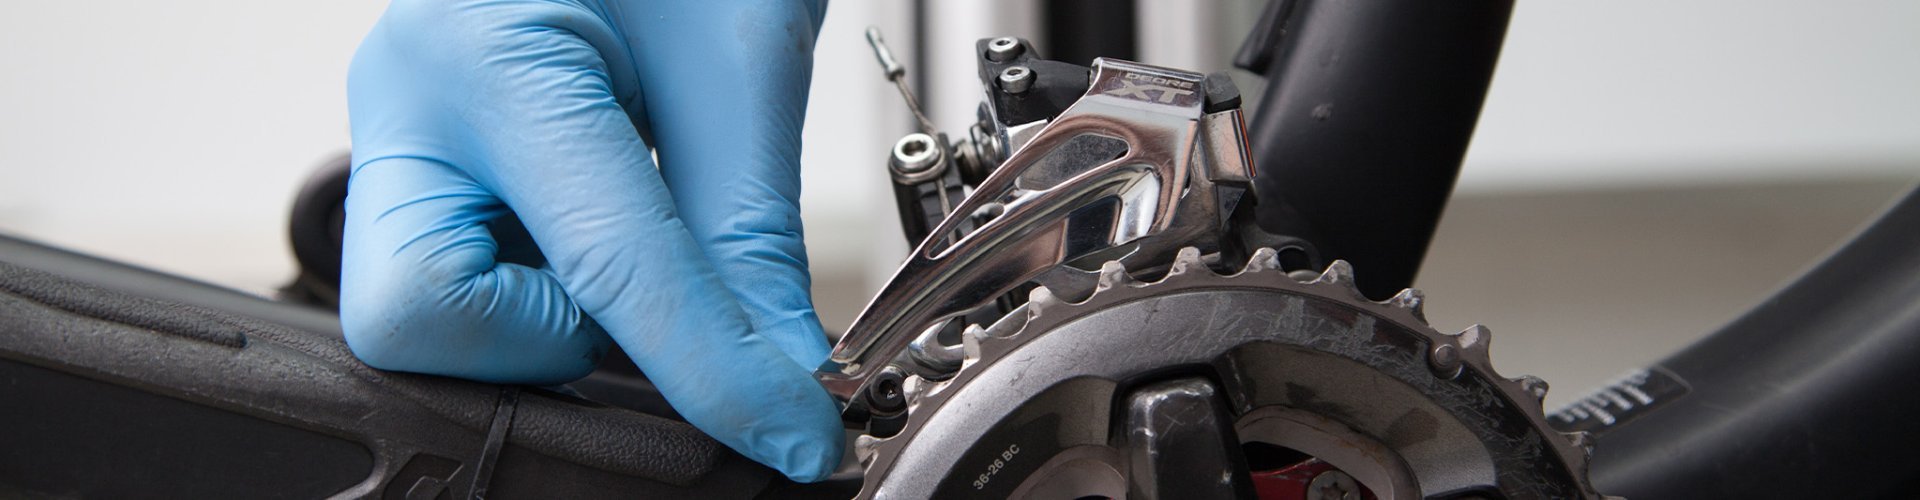
Whether you're shifting with Shimano or SRAM - we'll show you how to properly adjust the front derailleur on your mountain bike.
Got a crankset with two or three chainrings on your mountain bike? Then, you'll really benefit from knowing how to adjust the front derailleur. The basic functioning principle of the front transmission on a bike is tried-and-true and simple: A guide plate pushes the chain towards the chainring you want to shift to. Adjusting the front derailleur mostly just involves aligning this guide plate to the chainrings and setting a few limits on how far it can move in either direction. Once you've got the front derailleur properly mounted and adjusted, you should be set for a while. Since you'll need to shift gears during the adjustment process and the rear wheel needs to spin freely, we recommend hanging your bike on a workstand. A stand that just lifts the rear wheel works too. When adjusting the front derailleur, you'll also need to shift gears at the back. So, you should have the rear derailleur set up already. Check out our separate post for tips on how to best do that.
Front derailleurs for mountain bikes come in a few different types from Shimano and SRAM, which have some fundamental technical differences. When you want to install a new front derailleur, it's crucial to choose the right model for your bike. You can use the one already installed as a template or check the manufacturer's description to see which type is compatible with your frame. If you're not sure, we're happy to help via email or phone. The following are aspects in which front derailleurs differ in terms of frame compatibility:
Also, you should keep tire clearance in mind. On bikes with particularly short chainstays, it might happen that the front derailleur interferes with the side knobs of wider tires when shifting to the small chainring.
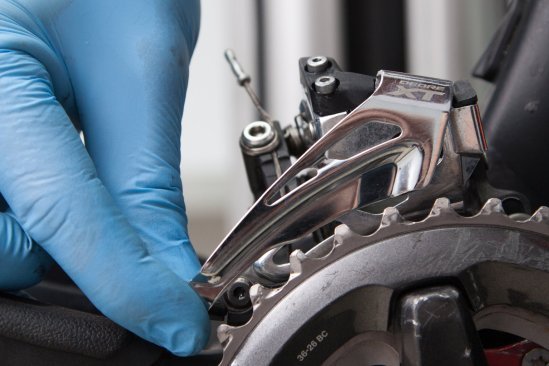
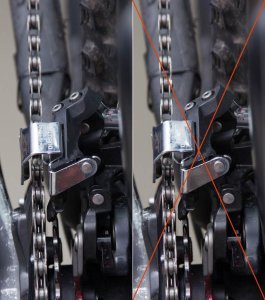
Before you can adjust the front derailleur on your mountain bike, make sure it's correctly mounted. Viewed from above, the guide plate should be parallel to the chainrings. The height is also important. Mounted too low, the front derailleur will hit the chainring teeth. Mounted too high, and it won't shift correctly.
From the side, there should be a gap of about one to three millimeters between the guide plate and your largest chainring. You can adjust both parameters - the angle and the height of the guide plate - by slightly loosening the clamp or Direct-Mount attachment of the front derailleur and then tightening it after alignment. Make sure to pay attention to the recommended torque!
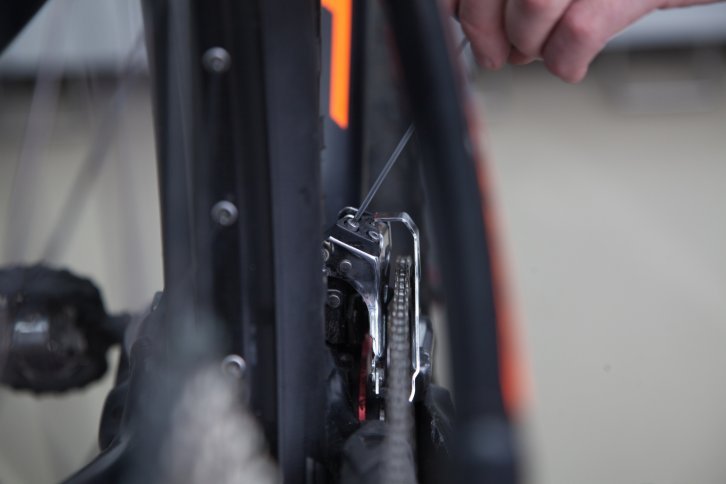
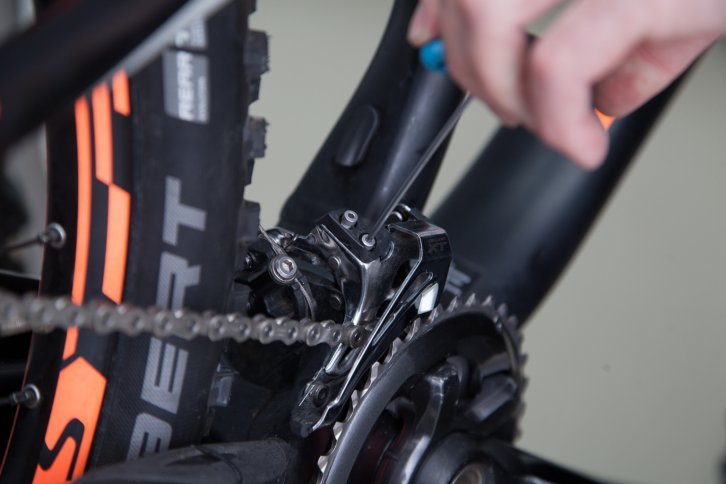
To prevent the chain from falling off towards the frame or rubbing against the guide plate of the front derailleur during shifting, first adjust the inner limit. That's the lower limit. Shift to the largest sprocket in the back for this. If a shift cable is already clamped, then shift to the smallest chainring at the front. If no cable is mounted yet, the front derailleur will be at its lowest position. Some models come with a plastic block slightly preloaded to facilitate alignment. Remove this if that's the case. With the screw for the lower limit, you can now restrict how far the guide plate can move towards the frame. This screw is often marked with an L (for "Low"). If you can't find a mark, check the manual to see which of the two limit screws is the correct one. Turning the screw clockwise will move the front derailleur away from the frame and vice versa. The lower limit is correctly set when the inner guide plate is about one millimeter away from the chain in the easiest gear and barely doesn't rub when pedaling.
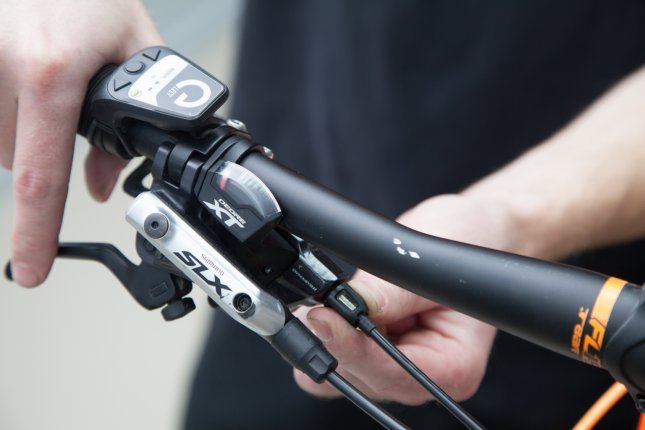
Once the lower limit is set, the next step is to clamp the shift cable or check the tension if it's already clamped. Pay attention to the condition of the cable housing - it greatly influences shifting precision. You'll always get the best results with a new shift cable and new housing. The cable housing should be laid in smooth curves. How exactly the cable is routed to the clamp on the front derailleur varies significantly between models. So, it's best to refer to the manufacturer's instructions. Be careful with so-called Dual-Pull front derailleurs: Depending on the frame's cable routing, they may be controlled from either below or above. The cable is then routed differently on the same front derailleur. Make sure your shift lever is in the correct gear, turn the tension adjustment screw on the shift lever all the way in and then back out one turn. Pull the cable taut and secure it with the clamping screw on the front derailleur, paying attention to the correct torque. Trim any excess to a few centimeters with cable cutters and protect the end with a cap to prevent fraying.
Adjusting the inner wire tension using the barrel screw at the gear shifter
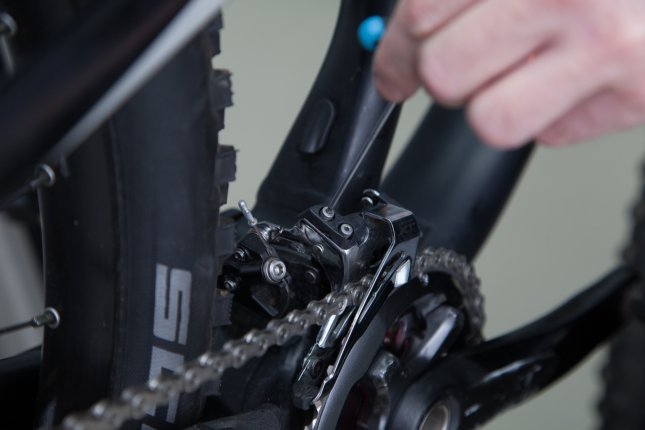
Now, you can shift to the second chainring. If the chain doesn't jump to the larger chainring, then increase the cable tension by turning the adjustment screw on the shift lever out a bit. Proceed in small steps of about a quarter turn and try shifting again. If your front derailleur successfully shifts to the second ring, then you can run through the cassette at the back to see which gears work smoothly. It's not unusual for the chain to rub against the guide plate of the front derailleur when you're on the middle chainring and the largest or smallest two sprockets at the back. With the cable tension, you can fine-tune the usable range.
After you've adjusted the cable tension, it's time to set the upper limit. If you have a double crankset, you're already on the biggest chainring. If you have a triple crankset, now you shift from the middle to the biggest chainring. With the upper limit, you can now limit how far the front derailleur can swing away from the frame. If the limit is set too far out, the guide plate might push the chain too far and it'll drop off. If the limit is too far in, you won't be able to shift up. You adjust the upper limit with the second screw – usually marked with an H for “High”. Turning the screw in (clockwise) moves the limit inward, closer to the frame and vice versa. You've correctly set the upper limit when the chain barely doesn't rub against the outer guide plate while it's on the smallest sprocket at the back.
Once you've set both limits and the cable tension, you're basically good to go. For a final check, shift through all possible combinations of chainrings and sprockets. Pay attention to the chain's angular run and where it might rub against the front derailleur guide plate. If this happens with the combination of the biggest one or two sprockets with the biggest chainring, it's not a big deal. You should avoid pushing hard in these extreme angles anyway. You also have gears with the same ratio available when you switch to the middle chainring and onto smaller sprockets. The same applies for the combination of the small chainring with the smallest sprockets. Everything works as it should? Then you should take it for a test ride on the trail!
You've made all adjustments and checks, but your front derailleur is still giving you troubles? Here's a list of what might be the issue and what you can do:
Ready for the season? We’ll show you how to prepare your bike for the upcoming season and which parts require special attention.
Here you’ll find an overview of the most important technologies and components for shifters & derailleurs on MTBs, road bikes and everyday bikes.

They shift quickly & precisely: electronic shifters & derailleurs are now used on many high-quality bicycles. An overview of various systems.
XTR, XX1, X01, Deore, etc. – The choice of shifters & derailleurs for MTBs is huge. Find out which is the right one for you here.

Whether you’re a sprinter or a mountain enthusiast, a nerd for classics or a fan of light materials, our tips will guide you to the right road bike system.

Gearing for gravel bikes needs to meet specific demands. By now, there's a wide selection of gravel gearings on the market. Here's an overview for you.
How does the freehub on a bike work? What should you pay attention to when converting shifters &derailleurs, which freehub is compatible with which models?


Send your unused goods back within 100 days after purchase and get your money back!
See more